Train and evaluate a model
Use this workflow when you have reviewed development data and a separate, reviewed test set. Development data may influence training decisions; test answers must remain unseen until the final evaluation.
You can follow either of two training routes:
| Goal | Route |
|---|---|
| Explore whether training works | One ordinary fit |
| Produce a study or release result | Select the training duration, then restart and refit on all development data |
If you only want to evaluate existing predictions, skip directly to Evaluate predictions.
Before you begin
You need:
- a MedDeID project that was split before review;
- completed train, validation, and test assignments whose document IDs still match those project splits; and
- a training configuration that identifies the starting model and language profile.
See Prepare and annotate data if those reviewed files do not exist yet.
Install the released tools:
The training extra also installs meddeid, which is used later to generate
predictions from the exported model. If you only need to score and plot
predictions that already exist, install meddeid-eval[plots] instead.
1. Prepare the training files
Owner: meddeid-data
Pass the three completed assignments to prepare-training:
meddeid-data project prepare-training my-project \
  --selection-train my-project/assignments/train-reviewed.jsonl \
  --selection-validation my-project/assignments/validation-reviewed.jsonl \
  --test-gold my-project/assignments/test-reviewed.jsonl \
  --output prepared-data/experiment-01
The command verifies completion, document membership, text, labels, and
checksums before creating three views under prepared-data/experiment-01/:
| Directory | What it contains | Use it for |
|---|---|---|
fit |
Separate train, validation, and test files | One ordinary experiment |
selection |
Train and validation files; the test file is empty | Choosing the training duration without seeing test answers |
refit |
All development documents for training and the sealed test set | Restarting, fitting all development data, and evaluating once |
Use --development instead of the two --selection-* options only when train
and validation were deliberately reviewed as one combined development
assignment.
--output defaults to my-project/prepared for compatibility. Give different
data or split snapshots distinct output directories. When several training
runs use the same prepared snapshot, reuse this directory and give every
training invocation a distinct --run directory instead.
The command does not modify the reviewed source files and will not overwrite a
non-empty prepared/ directory.
2. Create the training configuration
Owner: meddeid-training
Save a small YAML file such as training.yaml:
model_name: stighellemans/meddeid-dutch-synth
model_revision: <immutable-hub-revision>
language_profile: nl-BE
device: auto
epochs: 12
seed: 42
save_best_metric: entity_f1
early_stopping_patience: 3
early_stopping_min_delta: 0.001
early_stopping_min_epochs: 3
model_name is the model from which training starts. Use its immutable Hub
revision so separate runs cannot resolve different model versions. You can
inspect the model and copy its reported revision with:
For English data, use the English starting model and en-GB or en-US. When
one training dataset deliberately contains both profiles, replace
language_profile with:
The remaining training parameters have defaults. Add or change them only when
they are part of the experiment you intend to run. The
meddeid-training repository
documents the complete configuration.
In the configuration above, epochs is a ceiling. Selection keeps the absolute
best validation checkpoint and stops after three epochs without a meaningful
validation improvement, beginning after epoch 3. Refit then restarts from the
pinned source model and trains on all development data for the selected count;
it does not use its now in-sample validation metrics for another selection.
This reduces overfitting risk, but it cannot replace a sufficiently large,
representative validation split and a test set that is consulted only once.
3. Run one ordinary fit
Use this route for exploration or an ordinary train/validation/test experiment:
meddeid-train fit \
  --config training.yaml \
  --data prepared-data/experiment-01/fit \
  --run runs/experiment-01/fit
Training uses the validation set to retain the best checkpoint, then evaluates
that checkpoint on the test set. The selected checkpoint is written to
runs/experiment-01/fit/checkpoints/best.pt.
Do not use repeated ordinary fits on the same test set to select hyperparameters. Once test results influence another training decision, the test set is no longer independent.
4. Select and refit for a study or release
Use this two-stage route when the final test result must remain independent of training-duration selection.
First, select the number of epochs using only the development train and validation data:
meddeid-train select-epochs \
  --config training.yaml \
  --data prepared-data/experiment-01/selection \
  --run runs/experiment-01/selection
This writes the selected epoch count to
runs/experiment-01/selection/run.json. The test file in this view is empty,
so this stage cannot score the test set.
Then restart from the original model and train on all development data for that fixed number of epochs:
meddeid-train refit \
  --config training.yaml \
  --selection runs/experiment-01/selection/run.json \
  --data prepared-data/experiment-01/refit \
  --run runs/experiment-01/refit
Refit does not continue from the selection checkpoint. It starts again from the same model revision, combines the development train and validation data, and evaluates once on the sealed test set.
Export the trained model
Export the checkpoint from the route you chose. This example uses the refit
run; use the corresponding runs/experiment-01/fit paths after an ordinary
fit:
meddeid-train export \
  --checkpoint runs/experiment-01/refit/checkpoints/best.pt \
  --run-metadata runs/experiment-01/refit/train_metrics.json \
  --output release/my-model
The release/my-model directory is a self-contained MedDeID model bundle. Use
that exported directory—not an in-memory model or an unexported checkpoint—for
the final inference and evaluation.
5. Evaluate predictions
Owner: meddeid-eval
Generate predictions from the exact exported bundle. The example uses the
refit test view; use prepared/fit/test.jsonl for an ordinary fit:
meddeid batch prepared-data/experiment-01/refit/test.jsonl \
  --model release/my-model \
  --output predictions/test.jsonl
Run the complete paper-style evaluation battery against the unchanged test gold:
meddeid-eval battery \
  --gold prepared-data/experiment-01/refit/test.jsonl \
  --predictions predictions/test.jsonl \
  --name my-model \
  --output-dir results/battery
The command reads metadata.lang from the gold data and automatically runs the
matching public MedDeID baseline on the same documents. It produces a Markdown
report, aggregate and per-label CSV/JSON tables, PNG/PDF figures, a primary-label
confusion matrix with explicit missed and spurious outcomes, subannotation
detected-versus-missed coverage, and paired 95% intervals from 10,000
complete-document bootstrap samples.
The main figure keeps four outcomes in one panel: label-agnostic core-PII coverage, primary-label accuracy among one-to-one matched overlapping spans, exact-span F1, and non-PII redaction. This makes boundary, label-assignment, privacy-coverage, and over-redaction failures distinguishable at a glance.
Subannotation categories are gold-only analysis labels; MedDeID does not predict them. They therefore have a coverage matrix rather than a predicted-subcategory confusion matrix.
For a lower-level single-system score without baseline inference or uncertainty:
meddeid-eval score \
  --gold prepared-data/experiment-01/refit/test.jsonl \
  --predictions predictions/test.jsonl \
  --name my-model \
  --output results/my-model.json
The result includes exact-span and character-level metrics, core-PII recall, and unnecessary redaction outside the reviewed identifiers. Detailed subannotation metrics appear only when the test gold contains those optional labels.
Compare systems and create figures
To compare another system, run it in its own environment and convert its
predictions to the MedDeID result format. Score it against the same gold file
with the same meddeid-eval version.
Render one or more score files together:
meddeid-eval plot \
  --scores results/my-model.json results/comparator.json \
  --output-dir results/plots
The command writes PNG and searchable PDF figures. Consult the
meddeid-eval repository
for metric definitions, stability analysis, and additional plot options.
The following figures illustrate this output using a synthetic Dutch chatbot domain-shift experiment. The 60-document corpus was divided into 40 training, 10 validation, and 10 sealed test documents; all 14 primary labels were represented in every split.
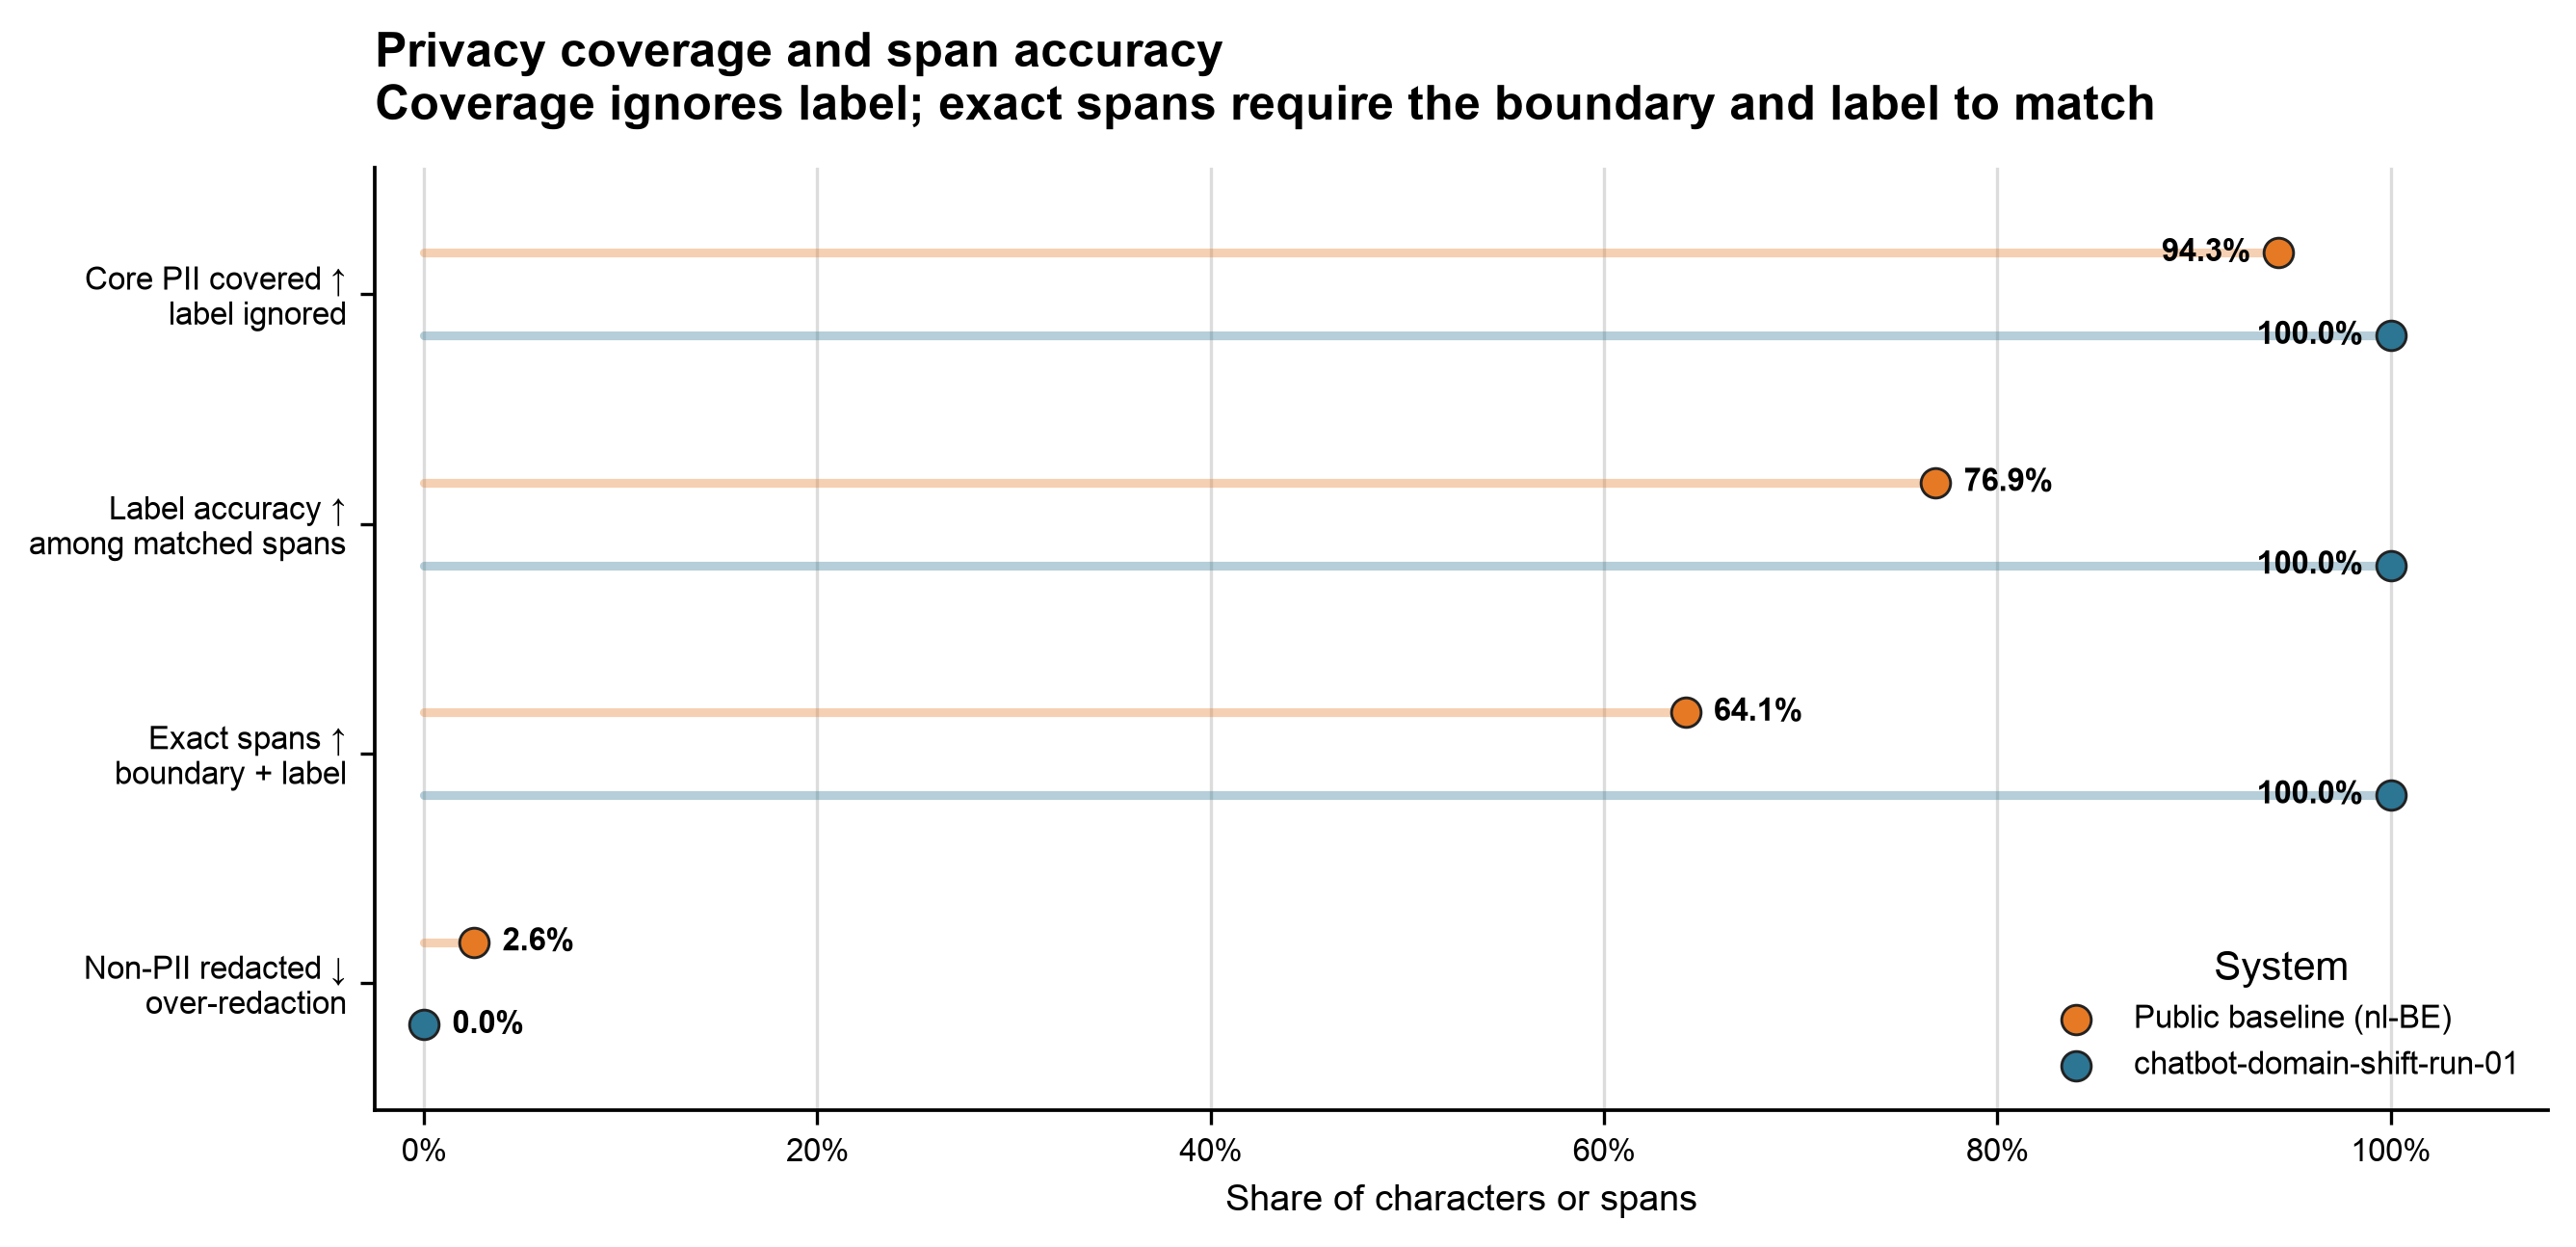
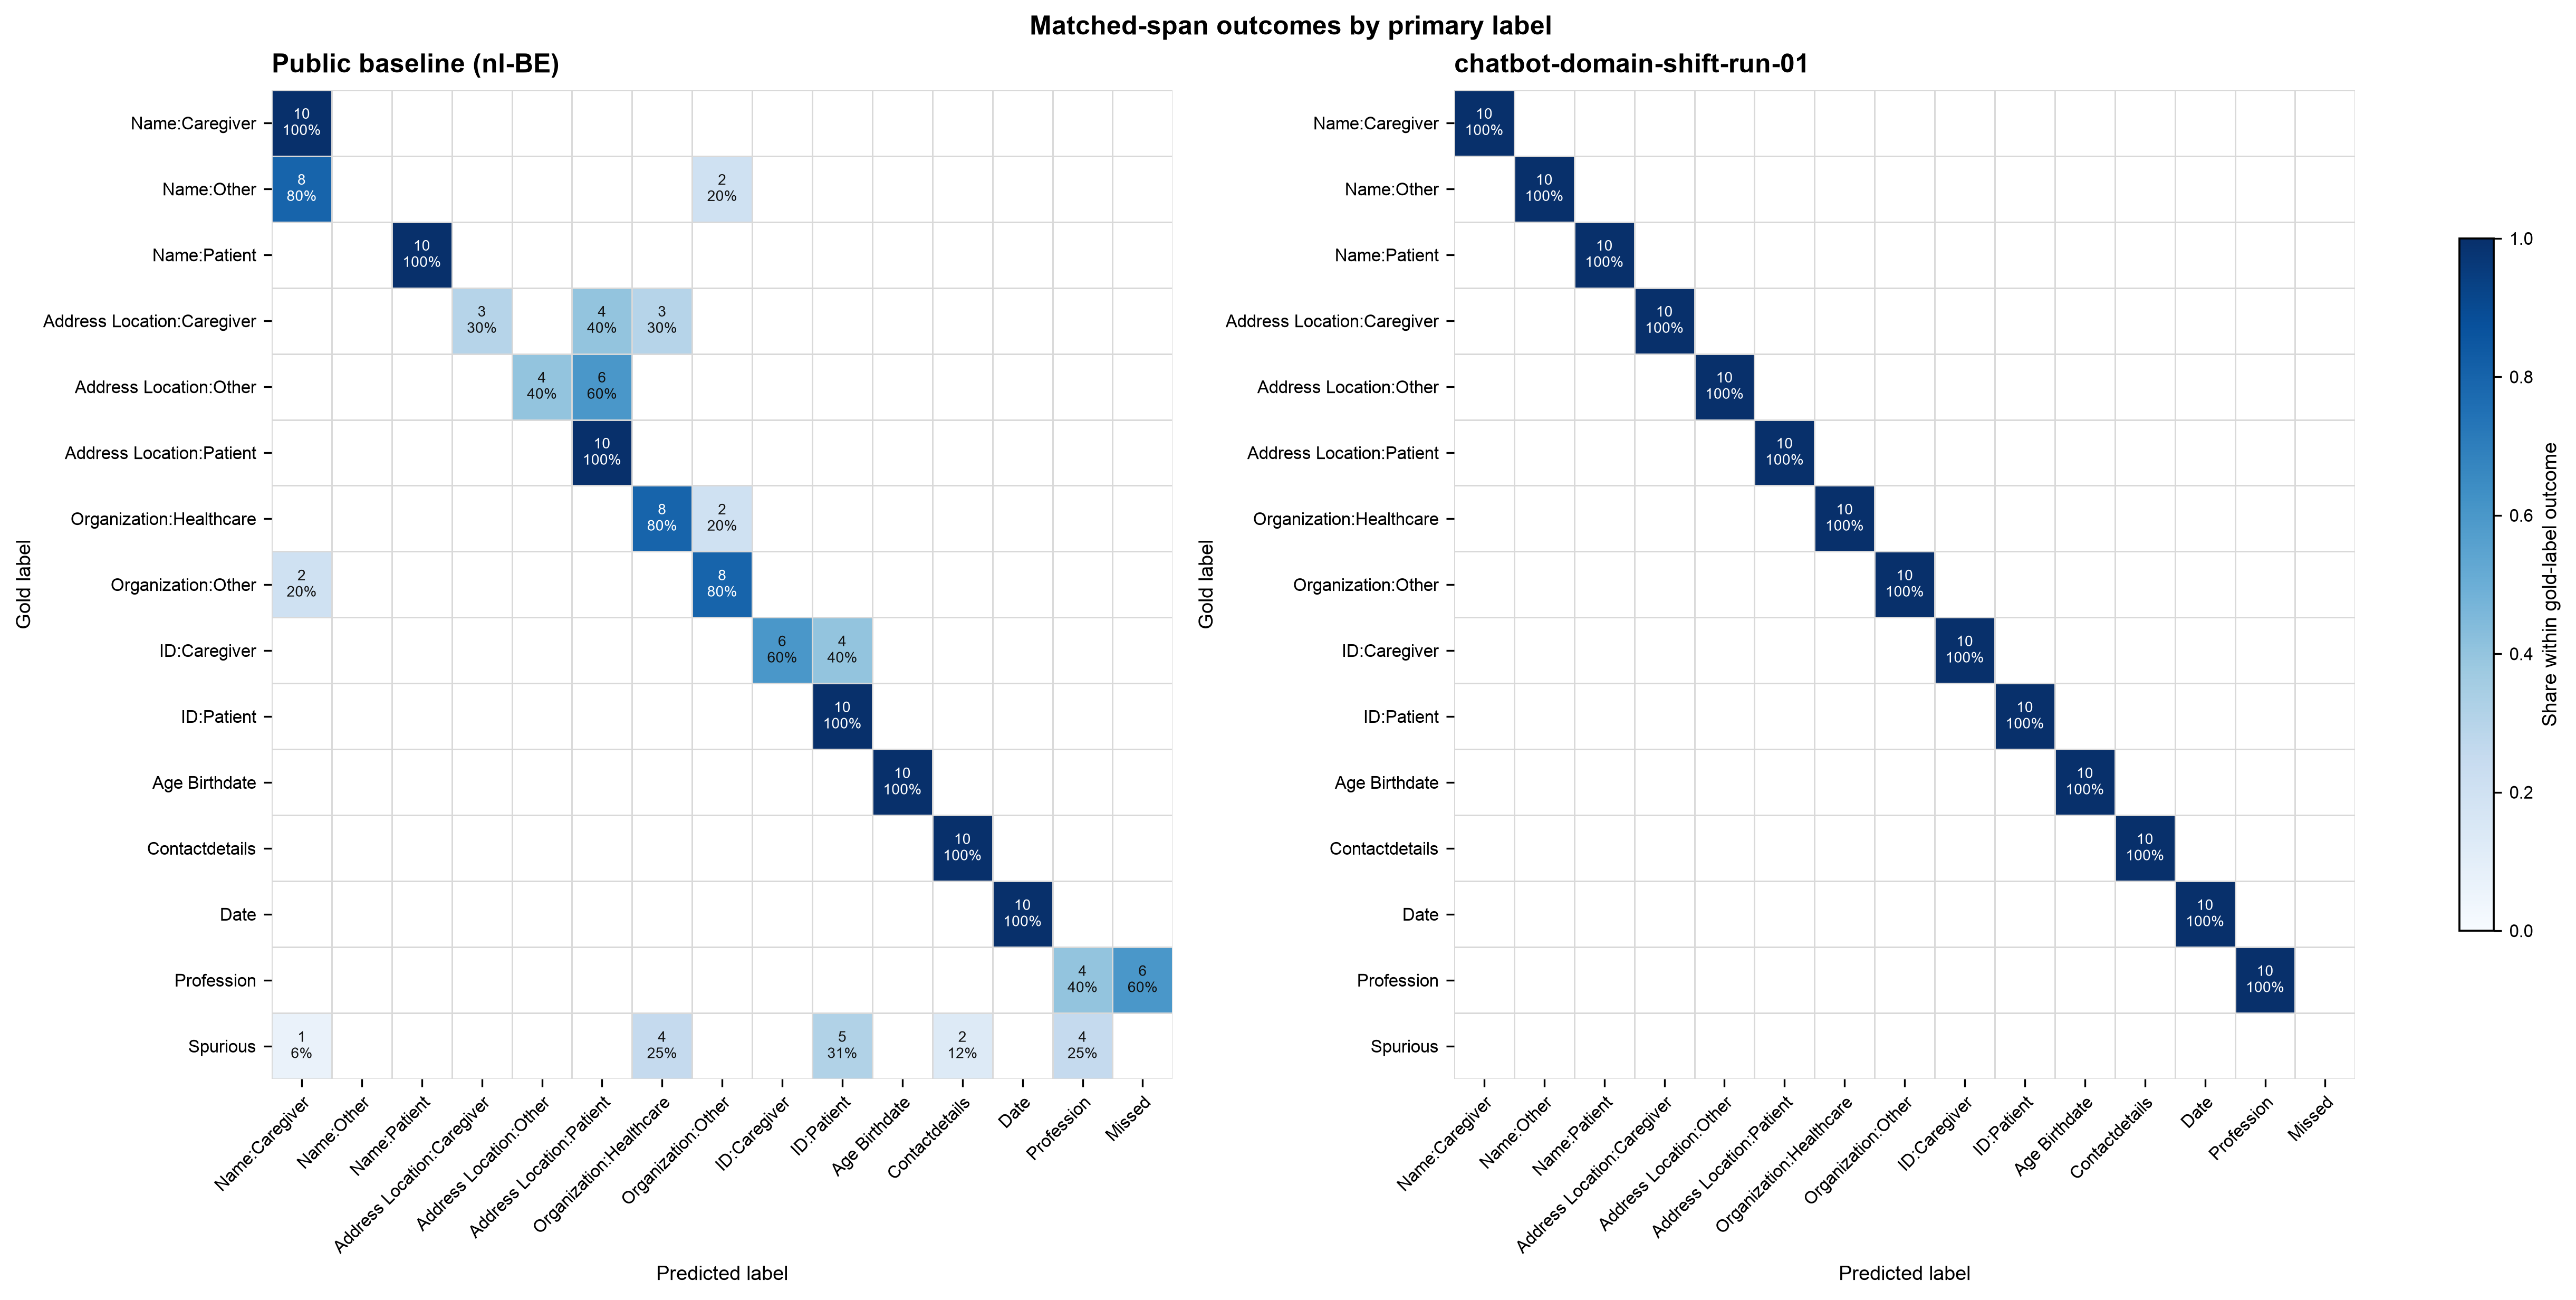
These are integration-test illustrations, not estimates of clinical or production performance. Real deployment claims require independently reviewed, representative local test data.
Keep with the result
Keep enough information to identify the complete run:
- the reviewed development and test manifests;
- the fixed project split;
training.yamland its random seed;- the starting model and immutable revision;
- the selected language profile and package versions;
- the training run metadata and exported bundle;
- the prediction manifest, score file, and exact commands; and
- relevant hardware and measured runtime information.
See Artifact lineage for how these files connect.